20.11.14

HALLWAY AND ENTRY PLANS

The last couple of weeks have been super busy and filled with everything but DIY - dinners, sleepovers, play dates, real dates...and it's been great but I'm so ready to get back to work.

We have totally neglected the hallway and entry of our new house. I think because you can go into each room, close the door, and forget about the crazy bare plaster, no organisation, piles of stuff chaos. The walls need so much prep before they can be painted so I have been majorly procrastinating - I know it's going to take so much time and produce so much dust! But because prepping and painting the walls and trim and laying the floor are on our 'finish what we started list' I have to give it a bit more attention.

The hallway started out with the same green carpet, shiny wood and bumpy wall combo that we had all over the house


and for the past year it's been looking like this:


We striped the wall paper, removed the carpets and took the door down to open the kitchen up as much as possible.

We'd love for our hall and entry to be warm and inviting but still light, clean and organised.


Now that my kids are older and out of nappies and push-chairs getting out of the house is way easier - but it's so much quicker when all the things we might need are right near the door. I also really want to make sure that there is a place for all the stuff that finds its way in and ends up on the stairs or on the kitchen counter - I made a list of everything so I can think about creative ways to store and organise them.
We're planning to add a console, a full length mirror, tons of baskets, boxes, trays and bins for storage and flowers and scented candles for good smells...I love walking into a house that smells good.

Our to-do list looks like this:
  • fill, sand and prime the walls
  • paint the walls (we're using a soft grey off white)
  • paint all the trim and doors (pure white in satin finish)
  • lay peel and stick vinyl planks on the down stairs floor
  • paint the upstairs floor white
  • paint the front door (probably dark blue)
  • strip the stairs and banister 
  • paint and stain the stairs and banister
  • add blinds to the windows
  • bring in a console table, mirror and storage 

We have all the supplies for the first five points and they're on my list of things to get done asap. and after a year of looking at dark red walls and a cracked floor I'll be so happy to open the door to a happier and cleaner entry...and then I get on the sticks in a jar flex and get this entry smellin' RIGHT. Can you tell how much I love a good smelling entry?

Is there anything you always keep right near the door to help those busy mornings go a little smoother? What's your favourite entry scent? Is it weird how much I love a good aroma? Don't answer that last one, I think I already know!


30.10.14

PROJECT ONE - ORGANISING TOY STORAGE


Although we're planning a bigger upgrade for the Trysil dressers in our living-dining room I wanted to make some quick updates to make them look and function a little better.


When we assmbled the drawers we just chucked the toys in without much organisation and it was hard for the girls to put their stuff away so that they could easily find everything again and it ended up looking like this


Time to organise!

I love the simple design of these drawers but I wasn't so hot for the grey wood effect veneer around the top and bottom of the exterior and on the bottom of each drawer.


I started by adding some washi tape - I tried gold and silver and decided on gold - it was so easy because the tape was almost the exactly the right width and I only used one roll of tape for both dressers...win!


For the bottom of the drawers I added some simple wrapping paper that the girls liked (it was £1.50 from saisburys) and attached it with Photomount.


To organise the drawers I used a mix of fabric boxes from Ikea and DIY cardboard boxes that I made from some old kraft paper files using this tutorial.


I also added a big basket I got when we first moved from Homesence for soft toys (it also hides our wireless router) and another one from Ikea to hold all the pictures the girls make until I can sort and store them.


I added a simple cardboard box for the kids drawing paper (I'd love to upgrade it for a wooden or metal one down the line) a lamp that we had on hold for our master bedroom, a marble box holding crayons and a framed picture of Misha's to the top of the dresser. I also added a little bowl for change - I find pennies everywhere so I like to have somewhere to drop them in each room (I would love to move the radiator from the adjacent wall so the dressers could be opposite the fireplace one day - then we could style them with some oversized art and a big lamp).


It makes a big difference for the girls when everything has it's place - it makes tidy-up time so much less stressful for all of us - it's something I hear all the time, and really it's a no-brainer, but I'm always surprised at how much easier 'a place for everything and everything in it's place' makes life!

Because the living-dining room is our only living space I love that when the kids are in bed the toys can be tidied away out of sight - so much better than the befores!


There are a few rouge toys that still don't have a home but 90% of the girls toys live in these drawers and 90% of the time toys end up back where they belong - and I'm loving those numbers.

For this project I used - wrapping paper, skubb boxes and washi tape that I had previously purchased for this project - and kraft paper folders, Photomount and PVA glue that I had on hand - so the cost of this project on the day was - £0 - yay! 1 down, 13 to go.

29.10.14

THE KITCHEN

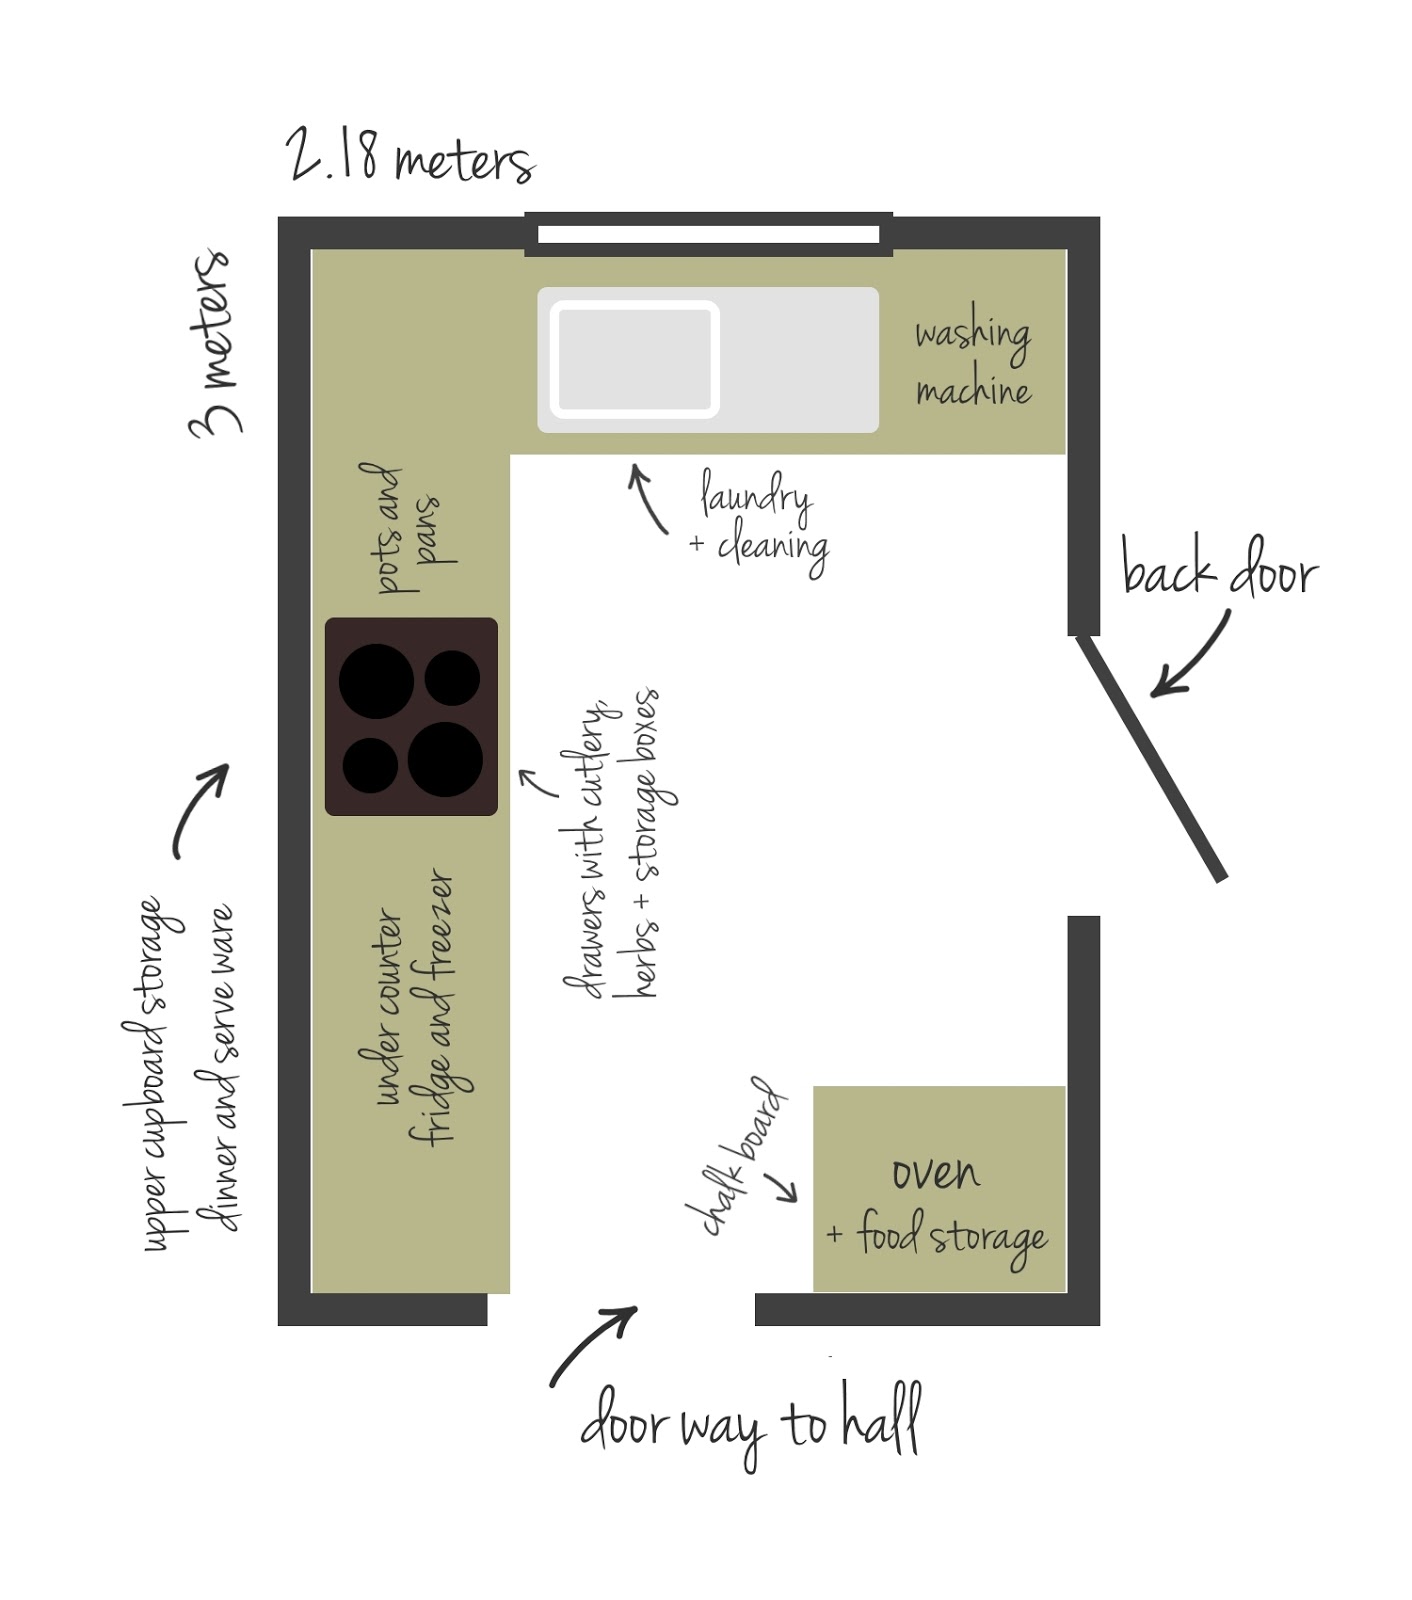
The kitchen of our new house is small and a little uninspiring - everything works, but everything could work better. 


We made some updates when we bought the house but when we moved in the kitchen kind of slipped off the bottom of my to-do list. I think it's because to stop using the kitchen, even for a couple of days, is so daunting. Where would we pour our cerial?! It's too much!

This was the kitchen before we moved in


So far we have removed the tiled backsplash, painted the upper cupboards and the cupboards surrounding the oven, painted the floor and walls and removed the lower cupboard doors so we can paint them, brought in our old washing machine and a second hand fridge and freezer, removed the door that separates the kitchen from the hallway and made a chalkboard.


It works, we can cook and wash dishes and clothes - but the more I spend time in there the more I'm itching to make this a space that is as functional and beautiful as it can be. I feel like we are really limited by the size and the layout but there are so many things we could do to make this a much happier place to be - I spend so much time in here washing, cooking and doing laundry that I feel like it really deserves a little more of my attention.
There are parts of this room that work well - I love the magnetic chalkboard and the under-the-sink storage but there are so many parts of it that aren't working as well as they could - it feels like we don't have enough storage for non-refrigerated food, our pots and pans are hard to get to, the paint on the floor is wearing and chipping off and the whole room is looking très unloved.

Although we are planning a full reno in here one day we are a few years away from being able to make all the big changes we want to - so we have a phase one make-over planned to make the most of the space we have in here while we're saving up.

We're going for something like this:


We'd love to create a really functional and light space with some rustic and industrial elements - lots of white and steel and wood - but still simple and classic. We're planning on white cupboard doors with dark counters and lots of open shelving. 

So our phase one to-do list looks like this:

- paint and rehang the lower cupboard doors and add hardware
- paint the counters
- cover the floor with peel and stick planks
- add base boards 
- remove upper cabinates and replace with wall to wall open shelving
- fill, sand and repaint walls and ceiling 
- build extra shelving above the oven 
- bring in a new light fitting

Breaking everything down in to a list makes me feel a little less scared of tackling this room - and the first three tasks on this list are already on this finish what we start list so I know that I can get them done without spending a lot of money. 

I really can't wait to start updating this room - I think it will inspire me to want to cook for guests and bake with the kids and sneak in to finish the left overs from the pan...all that good and happy kitchen stuff!

28.10.14

14 WEEKS TO FINISH 14 PROJECTS

Since we moved into this house I've learned that I'm not a closer - I start projects and don't finish them - and that DIYing an old house into a new home is expensive

When we moved I really wanted to make sure that that we lived within our means and that we didn't get into debt to make improvements - and I also wanted to try really hard not to have a 'this will do' attitude - to finish projects and rooms to the best of our ability. We're not going for perfection - just a house that we can be proud of because we have done the very best with what we have. But now a year in, although we have made a lot of progress and our house is starting to feel way more like home, I think we've lost those aims that we had when we started out. So I've set myself a challenge - I won't start any project that I haven't started or haven't already bought supplies for - and I wont spend more than £10 to finish each of those projects. 

The rules are:
1. It has to be a project that we have already planned  
2. We have to have already purchased the supplies for the project
3. We can only spend up to £10 (around $16 US) if we need small items like extra screws, nails, glue, sandpaper, thred etc - if a project is going to cost more than that to complete it will have to wait

I've counted 14 projects that we can do without spending money - some of them are really big, some of them are small but all of them will make an impact on how our house looks, feels and works. So I'm giving myself 14 weeks for 14 projects - my end date will be the 2nd of February 2015 (can you believe we're that close to 2015?! Aaaahhh!). I really hope setting ourselves this challenge will help us get back on track with money and time - and give us some motivation to finish what we start.


There are two things that we'll spend more money on - one is having our master bedroom re-skimmed (we already had a date booked in) and the other is painting the new fence our neighbours put in on the boundary we share (we need to do it asap to protect the wood) but that's it - no other cheats allowed!

Here are our 14 projects:

LIVING ROOM
1 - organise toy storage
2 - repaint the floor
3 - put up curtains 

GIRLS ROOM
4 - make cushion covers
5 - add book storage
6 - add decor

KITCHEN
7 - rehang cupboard doors
8 - paint the counters
9 - lay peel and stick tile

HALL
10 - fill and sand the walls
11 - paint the walls
12 - lay peel and stick tile
13 - paint the upstairs hall floor

MASTER BEDROOM
14 - clear and organise the mountains of stuff

I'm exited to look back at the beginning of February to see how much we have done and how much (or how little) money we have spent. Wish us luck!


24.10.14

I LOVE DINING

Not long ago I was planning a dining area that looked like this


but in reality it was looking like this


We got rid of the old sofa and camp tables and for a while we lived with it all empty


It was a pretty awesome dance party/lego city space but we took a trip to Ikea and purchased a table, two dressers and some chairs - and spent a romantic evening doing this 


and now it looks way more like a dining area...yay!


I remember when we used to go to Ikea and imagine what it would be like buying furniture for our house - it still feels so crazy that we're living the dream and doing it for real- it still hasn't sunk in yet!

The table is great - I love the simple style and it can seat 8 people cozy-squwushed-up style when it is small and around 12 when it's extended. I've always been drawn to dark wood but I'm really loving the lighter tones - and because it's solid wood we can paint or stain it later if we want.  


We bought the chairs knowing that we'll upgrade when we've got the money. Our perfect chairs are these ones from Marks and Spencer but at over £200 each they are way out of our budget - so we're planning on getting these ones from Ikea and using this tutorial to make some more kid friendly covers. When we upgrade the foldable ones we've got now will be great for extra seating when we have guests. 

We're also using some metal stools I bought from a junk shop a couple years ago - I paid £40 for three of them for our old house and I still love them (I've seen similar ones here)


At over £1000 the Westelm dresser in our moodboard is a total dream item! We bought two Trysil 3 drawer chests and put them right next to each other.


We're planning on upgrading them one day either by hacking it to look like the wood tiled one (like this) or maybe just by adding a new top and hardware. But for now it's working great for holding the girls toys - and looking way better than the old plastic box set up we had before


The next things on the list in here are refinishing the floor, adding some curtains and deciding what to do with the fireplace (you can see it peaking out in some of the pictures at the top of this post - it's just an unfinished hole at the moment and we don't know whether to block it up, add a surround or just tidy it up and fill it with wood or candles) and I'm excited to start styling with art, lamps, flowers and books - but for now I'm just so happy to have a place we can sit and eat a meal together with our family and friends...100% good times!


23.10.14

PAINTING OLD FLOORBOARDS WHITE

When we moved into our new house there was green carpet in the hall, living-dining room and bedrooms.


 It wasn't to our taste and wasn't in the best of conditions so the first thing we did when we had the keys was to pull them up and see what was underneath. In the living-dining room and bedrooms we found floorboards - they were pretty beat up, some had layers of stain and paint and there were lots of holes and damaged boards (in the hallway we found a very damaged stone floor that we plan to cover with peel-and-stick lino tile).


Although one day we would love to lay dark wood floors throughout the house (maybe something like this), we knew that we needed a more budget friendly solution for the phase-one stage. I've always loved the clean and simple look of white painted floorboards so we decided to try it out. 

It took us a while to get it right though - so I wanted to share what we learned.  


We live in the UK where EU law limits VOC content in paint - VOC's are bad for the environment but very good at keeping paint white, so regular oil based gloss or semi-gloss paint purchased in the UK will yellow very quickly. We were really set on white-white floors so we knew we would have to use water based paints. This made the process more complex because water based paint is much more prone to allowing stains to bleed through and discolour the final finish. 

After sanding the floors with a sand glider (we hired ours here) we painted the living room and girl's room floors with some cheap stain-blocking paint, a layer of undercoat, a couple layers of matt white paint and a couple layers of water based floor varnish. But almost instantly stains started to come through and the floor wasn't looking as fresh and clean as we were hoping for. 

(this picture was taken in the girls room where the dresser had been since we painted the floor so we're sure that these stains were from colour seeping through the paint and not spills or scuffs)

We tried again in the girls room and this time (touch wood!) the floors are looking super white and stain-less.


Here's what we did

one
We used a sand glider for prepping our floor boards but depending on the size and condition of your floor you could use different sanding methods - for a floor that's in great condition or for just a small area I think a hand held orbital sander could work just fine, or for floorboards that are really worn you may want to try a heavy duty sander.

two
We used this frame sealant to fill the gaps between the floorboards - doing this lessens the drafts coming through the floor and helps to keep the room warmer - it also stops dust that is hiding in the gaps getting into the paint. We applied it just like caulk - putting a line over the gap and pushing it in with a wet finger (I cleaned up any excess with a soapy sponge). For really big gaps I first filled it in with either expanding foam or rolled up paper and put the frame sealant on top (both methods worked fine).

three
I applied this undercoat which I use for everything - I only used one coat but if you are covering really dark floors you may need to apply two. I used a mini foam roller and a 2" paint brush. 

four 
This step was really important for us - I had tried lots of cheaper stain blocking paints but non of them had worked. Zinsser B-I-N is a little pricey but in my experience it's really worth it - FYI for this paint you'll need methylated spirit to clean your brushes - I used a mini foam roller and a 2" paint brush here too.

five
I think you could use any kind of white water based paint for this step (the kind designed for walls - I used this one because I had some on hand) - I only did one coat but you may need more - it's good to get the floor as white as you want it at this stage and not rely on the floor paint to add more coverage. I used a mini flocked roller and a 2" paint brush.

six
I used this floor paint because it had great reviews for its durability, and so far it is holding up really well - but I would say it's more of a tinted varnish than a paint because it is not very opaque so it doesn't provided much coverage (I wouldn't recommend the Diamond Hard Floor Varnish for painting white floors - it's what we tried first time round and it yellowed slightly).

I'm really happy with how the floors are turning out now that we have figured out a method that works for us - and although we still plan on dark floors further down the line it's a great low cost option in the meantime. Everything that people say about white floors has been true for us too - you have to sweep and clean them often because you can see every bit of dust and dirt. I don't mind that though, it keeps me motivated to clean the floors (it's one of those chores that I don't enjoy and would put off for ever if I could!) - I quickly sweep everyday and mop the floors once a week and that keeps them looking clean enough for me - and so much cleaner than those before pictures right?!